Logo Logo
Result
  • Home
  • agri wealth agri wealth app bill pay app bullion bwall wp theme chaincity chaincity app coinectra coinectra app dinehaus docfinder booking template app docfinder consultation template app etrendz ex rate finounce foody friend gamers arena gamers arena app gear fixer groomify hyip pro hyip pro app ico genie lens queen list place list place app list place template app mine stack next destina onfitz pay secure pay secure app ptc pro restaurant shutterly smm matrix swift send travel advaizar trip vendor waiz zylochat
  • Get Support
  • Preview Demo
Logo Logo
  • Documentation
  • Introduction
  • Screenshot
  • Prologue
  • Release Notes
  • Upgrade Guide
  • Getting started
    • Server Requirements
    • Server FAQ
    • Installation
    • Folder Structure
    • Cron Job Setup
    • Push Notification
    • In-App Notification
    • Email Notification
    • SMS Notification
    • Language Setup
    • Plugin Controls
  • Admin Panel
  • Admin Dashboard
  • Manage Module
  • Game Top-up
  • Voucher
  • Gift Cards
  • Sell Category
  • Kyc Management
  • KYC Setting
  • Edit KYC From
  • User Management
    • All User
    • Mail To User
  • Website Control Panel
    • Control Panel
    • Basic Control
    • GDPR compliance
    • Website Logo & Favicon
    • Push Notification
    • In-App Notification
    • Email Configuration
    • SMS Configuration
    • Language Setting
    • File Storage
    • Exchange API Setting
    • Plugin Controls
    • Maintenance Mode
  • Payment Gateway
    • Payment Gateway
    • Manual Gateway
  • Withdraw Gateway
    • Withdraw Method
    • Withdrawal Days Setup
  • Transactions
  • Transaction
  • Payment Log
  • Withdraw Log
  • Ticket Panel
  • Support Ticket
  • Themes Settings
  • Pages
  • Manage Menu
  • Manage Content
Image Description Image Description

Push Notification Settings

After installing the script successfully, you need to configure Push Notifications so that your users and site owner can send and receive alerts (order updates, announcements, offers, etc.)
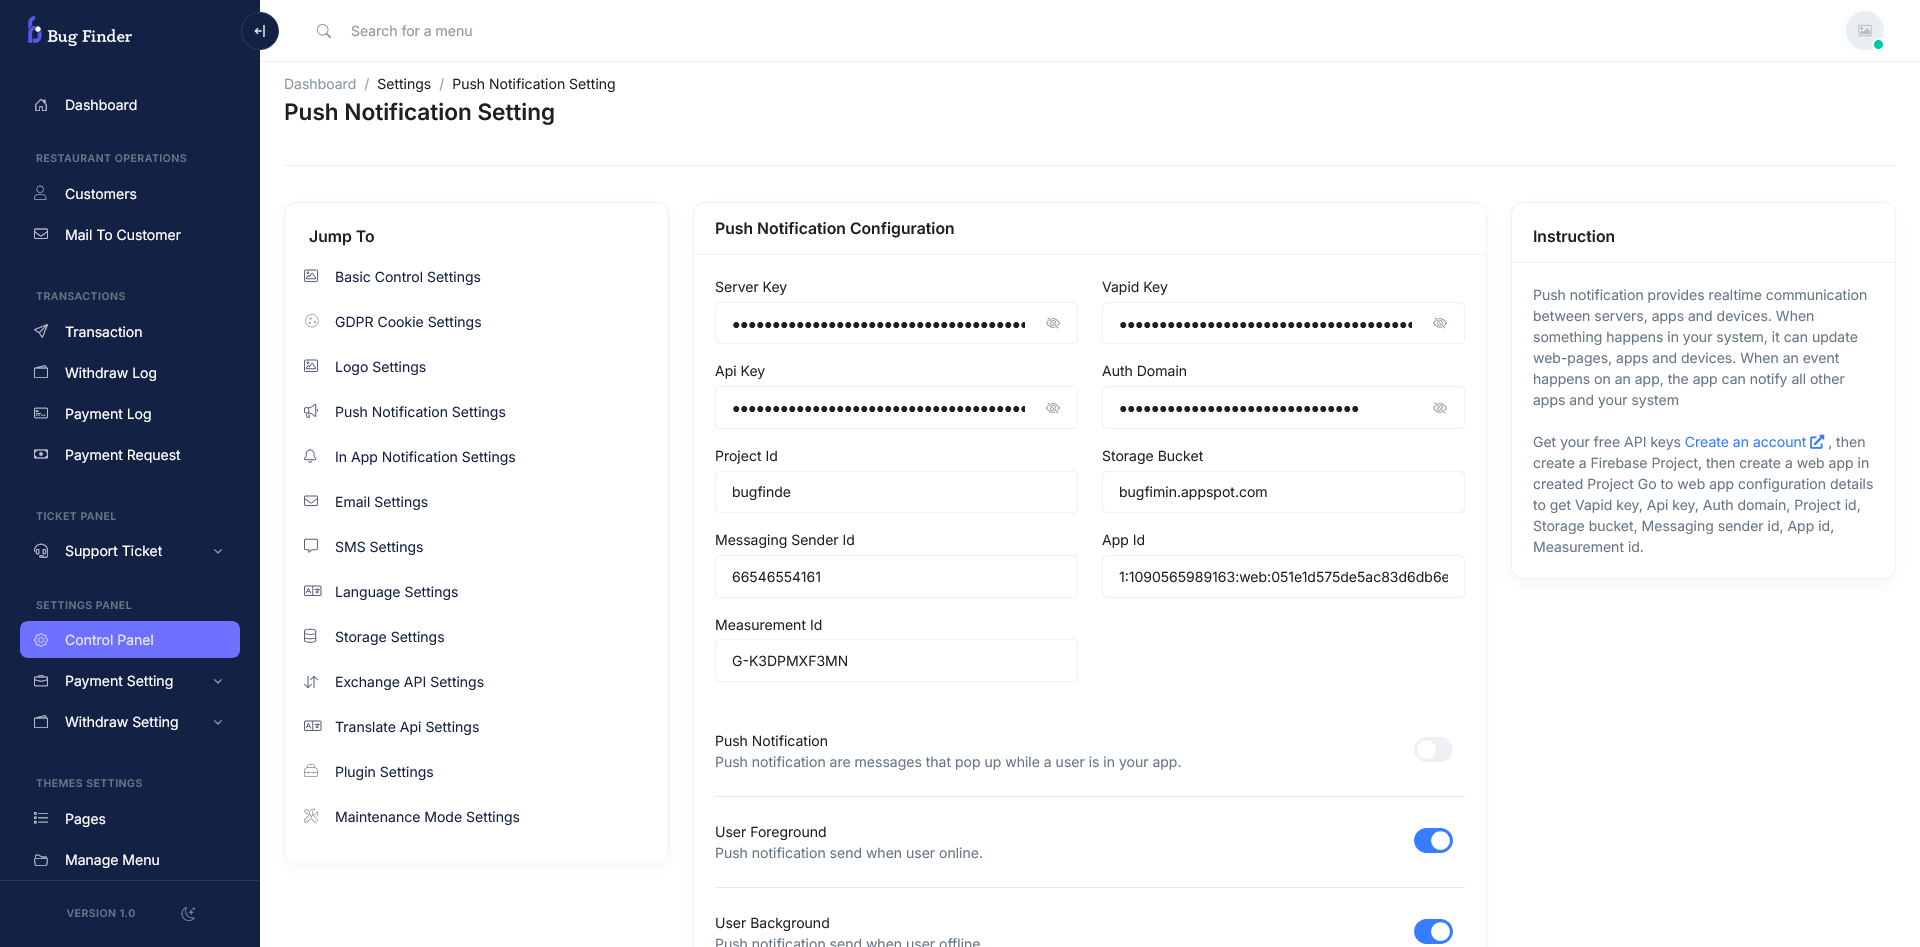
  • Step 01 - Create a Firebase Project

    We use Firebase Cloud Messaging (FCM) for sending push notifications.

    1. Visit Firebase Console
    2. Click Add Project → Enter Project Name → Continue
    3. Enable Google Analytics (optional) → Finish.
  • Step 02 - Get Firebase Config Keys

    1. In Firebase, go to Project Settings → General → Your Apps → Web App
    2. Add a new Web App if not already created.
    3. Copy the Firebase SDK Config values:
      • API Key
      • Auth Domain
      • Project ID
      • Storage Bucket
      • Messaging Sender ID
      • App ID
      • Measurement ID
  • Step 03 - Get VAPID Key (for Web Push)

    1. In Firebase Console, go to Project Settings → Cloud Messaging
    2. Scroll to Web Push Certificates
    3. Generate and copy the VAPID Key
  • Step 04 - Update Admin Panel Settings

    • In your Admin Panel → Push Notification Settings → Push Notification Configuration , enter:
      • API Key
      • VAPID Key
      • Auth Domain
      • Project ID
      • Storage Bucket
      • Messaging Sender ID
      • App ID
      • Measurement ID
    • save changes
  • Firebase Push Notification

If you failed to see this video, please click here